Navigation Bar


Custom Software
Upgrades
What's New
Update Download Page

Technical Support

A list of issues follows the section of macro-related information that is immediately below.

  Maintenance Updates
In a continuing effort to improve Script Werx, maintenance updates are available to all holders of a current license agreement, from our password-protected Update Download Page . You can request a password by e-mail or phone ([818] 952-8102). A password will be provided once you are confirmed as holding a current license.

If you see this...
The macro security setting on your installation of Microsoft Word needs to be changed:
  1. On the Tools menu, hover your cursor over Macro (on Macintosh, on the Word menu, select Preferences )
  2. On the pop-out pick-list that should appear, select Security (on Macintosh, click the Security radio button)
  3. On the dialog box that opens, you will probably see that security is set to high, select medium instead

If you see this...


Script Werx templates include a number of macros (see sidebar to right). They may cause the Warning dialog box (above) to display when creating a new script or opening an existing script. Unless there is reason for you to suspect the template or script of carrying a virus, Click the Enable Macros button.
Macros
Macros add functionality (features). They are like small computer programs that augment the underlying application (in this case, Word). Malicious hackers have discovered that macros are an effective way to spread damaging computer viruses. To defend against this, software applications now include features that identify when a macro is about to run and provide the option of disabling macros.

List of Issues

Bugs in Version 11, released 7/04.

Click on a symptom to move quickly to its solution:


Issues that may affect any Version
Click on a symptom to move quickly to its solution:
  Bugs in Version 10
Several bugs have been reported, and subsequently fixed, in version 10 ( huh? ) of Script Werx, which was released on 5/23/03. Click on a symptom to move quickly to its solution: Bugs in Version 9
The following bugs primarily affect Script Werx version 9 ( huh? ). Click on a symptom to move quickly to its solution:


Problem: Missing Templates
Script Werx Templates do not appear when going to the File menu and selecting New (or Project Gallery).

Cause:
There are multiple Templates folders on the hard drive and the Script Werx templates have been installed into the templates folder not being used by Word.

Solution:

The installer for the current Windows version of Script Werx has been redesigned to virtually eliminate this problem. However, should this problem occur anyway, first, run the installer again. If the problem persists, you may want to consider the Re-Point procedure described below.

Using the Macintosh version of Script Werx, any of the three procedures below will work, but the easiest choice would be to move the templates using the Template Mover utility.

  • Move Templates --Download and run the Template Mover utility, which will locate your Script Werx templates and move them into the correct Templates folder. Click here for additional information and download access.
  • Reinstall --(won't work for version 10 or above of Script Werx (huh?) for Windows) Determine which Templates folder is being used by your installation of Microsoft Word and then reinstall Script Werx into that folder ( first set of instructions below ).
  • Re-Point --Point Word to the Templates folder in which the Script Werx templates are already installed ( second set of instructions below ).

Determining Factors:
  • Reinstalling may be safer because you are not changing where Microsoft Word looks for its Temples. However, running the installer again may take longer. If you are using other templates, or have modified your Normal template, this would be the best choice.
  • Re-pointing Microsoft Word to your existing installation of Script Werx templates may be quicker, depending on how long it takes your computer's Search or Find tool to locate the Script Werx templates.

Reinstall:
Reinstall Script Werx into the Templates folder being used by Word.
Steps   Details
• Find which Templates folder is currently being used by Word   Within MS Word:
  • From the Tools menu, select Options (In Macintosh 98 Preferences ; in Macintosh 2001, on the Edit menu select Preferences ).
  • Select the File Locations tab
  • Under File Types , find User Templates and click once to select it.
  • Click Modify .
  • Use the browse box that opens to determine the path to the currently selected Templates folder
  • Write down the path to this folder
  • Cancel out of both dialog boxes.

• Reinstall Script Werx templates into the Templates folder being used.

  • Run the Script Werx Installer
  • Select Custom to install the templates only (the users guide and examples should already be installed in a folder named Script Werx )
  • On the screen asking you to confirm the destination folder for the templates, be sure to select the path you wrote down

• Check that templates now appear
 
Within MS Word:
  • On the File menu, select New.
  • All Script Werx templates should now appear

Re-Point Word
Re-point Word toward the Templates folder in which the Script Werx templates are already installed
Steps   Details
• Find where the templates are installed  
  • Use your computer's Find or Search tool to locate the location of one of the Script Werx templates, such as FetrFlm.dot (Feature Film Template, in Macintosh)
  • Write down the path to this folder

• Point Word to that folder

Within MS Word:
  • From the Tools menu, select Options (In Macintosh 98 Preferences; in Macintosh 2001, on the Edit menu select Preferences ).
  • Select the File Locations tab
  • Under File Types , find User Templates and click once to select it.
  • Click Modify.
  • Use the browse box to select the appropriate Templates folder.
  • Click OK to close both dialog boxes.

• Check that templates now appear

Within MS Word:

On the File menu, select New

All Script Werx templates should now appear


Move Templates:
Move the Script Werx templates from where they have been installed into the Templates folder being used by Microsoft Word.
Steps   Details
• Find which Templates folder is currently being used by Word   Within MS Word:
  • From the Word menu, select Preferences (on Windows, from the Tools menu, select Options).
  • Select File Locations.
  • Under File Types , find User Templates and click once to select it.
  • Click Modify.
  • Use the browse box that opens to determine the path to the currently selected Templates folder
  • Write down the path to this folder
  • Cancel out of both dialog boxes.

• Find where the Script Werx Templates have been installed  
  • In Finder, from the File Menu, select Find, then use the Find dialog box that opens (In Windows, click Start , then use Find (or Search)) to locate the Script Werx templates. Look for a template name such as -Storyboard Template.dot.

• Open the folder containing the Script Werx templates.
  • Note the path to the folder containing the templates. The folder's name will probably be Templates
  • Find and open this folder.

• Find and display on your computer screen the Templates folder where the templates should go.
  • Use the path you wrote down in the first step of this procedure to find the Templates folder being used by Word.
  • Arrange the items on your computer screen so that you can see both this Templates folder and the Script Werx templates.

• Select all of the Script Werx templates and drag them into the appropriate Templates folder.  
  • Select all 13 Script Werx Templates (listed in chapter 1 of the user guide under What's Installed; Script Werx versions lower than v10 will have only 12 templates).
  • Drag all Script Werx templates into the other Templates folder.

• Check that templates now appear   Within MS Word:
  • On the File menu, select Project Gallery (in Windows, select New.)
  • In Word XP only, a New Document screen may appear, click New from Template > General Templates.
  • All Script Werx templates should now appear.


Problem: Character Cues Disappear...
in a screenplay-format script, causing action to be pulled into dialogue, after using Repaginate (on the Script Werx menu). Or you may not readily understand what went wrong, but the script format is "all messed up."

This happens only on character cues using the TV-format indication that a character's dialogue continues after an action description, such as:

 
Character Name
Character begins speaking here, going on and on and on, until...
 
Some type of action happens.
 
Character Name (CONT'D)
The character continues speaking, after being interrupted by the action.
 
Cause:
This was caused by the Repaginate command assuming that any character cue followed by "(CONT'D)" must be part of pagination marking and should be deleted before a fresh repagination is performed. This should not occur when using the feature-film-format indication for continuing dialogue (the word "continuing" under the character cue as a parenthetical direction) or if Repaginate (Script Werx menu) is not used.

Solution:

Download and install the current maintenance update, or use any version of Script Werx that is 11.1 or above.


Problem: Import Script does not work.
The Import Script procedure (on the Script Werx menu) does not complete and locks up Word.

Cause:
This is caused by one of those "Microsoft knows best" features that overrides what you--or in this case, our software--fully intends to do, without any warning.

Solution:

Turn off the feature and try again. The Script Werx template will remember all of the character names that you have already entered.

With the script into which you are importing (or any other Word document) open:

  • On the Word menu, select Preferences (on Windows, from the Tools menu, select Options); then select Edit.
  • Deselect (click to remove the check mark in front of) Smart Cut and Paste.
  • Click OK to close all open dialog boxes.
You should now be able to import an existing script. And any character names you entered during a previous attempt will be entered into the Character Names dialog box automatically.

This has been corrected in our current maintenance update and on all versions of our software beginning with version 11.1.

Top of Page


Problem: Option to create a clone template is not provided when names have been added to the Character Toolbar and you start to create a new script.

Cause:
Problem in the computer code that runs when creating a new script.

Solution:
  • On the Script Werx menu, select Preferences.
  • In the Script Werx Preferences dialog box, locate the Opening Tutorial area.
  • Click the radio button for Don't give tutorial option.
  • Click OK.
Now, when creating a new script from a template that has names added to the Character Toolbar, you will be offered the option of preserving that template with the Character Toolbar intact and creating a clone template with a blank Character Toolbar.
You can turn the tutorial option back on at any time by returning to the Preferences dialog box.
Top of Page

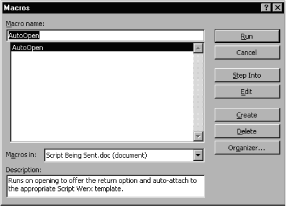
Problem: Script Does Not Open
on a Macintosh on which Script Werx is not installed. This may occur regardless of whether the script was created on a Windows or Macintosh computer.

Cause:
An AutoOpen macro (computer code that runs automatically when a document opens) uses the Windows name of the Normal template (Normal.dot) rather than the Macintosh name (Normal). This macro normally helps a script find and attach to the appropriate Script Werx template when the script is moved among different computers.

Solution:
This needs a two-step solution: Fix existing scripts; stop the problem from happening again.

Fix existing scripts –The immediate solution is to hold down the Shift key when opening the script. The more lasting solution is to delete the AutoOpen macro:

  1. Open the script (holding down the Shift key if the appropriate Script Werx template is not installed)
  2. On the Tools menu, select Macro and then from the pop-out menu, select Macros...
  3. In the Macros dialog box that opens, make sure the Macros in: field displays the file name of the script from which you want to delete a macro. A single macro, AutoOpen, should display.
  4. Click to select the AutoOpen macro and then click the Delete button

The name of the macro (AutoOpen) should disappear.

Stop the problem from happening again – obtain a free maintenance update or replace the currently installed template file named Template Attach Tool.dot with one of the following downloads (appropriate to your computer).

  • For Macintosh this is the copy of Template Attach Tool.dot to download.
  • For Windows this is the copy of Template Attach Tool.dot to download.
    Once downloaded, replace the existing template (Template Attach Tool.dot) with the download
    1. Find the Script Werx templates on your hard drive: On Macintosh use Sherlock. On Windows, click Start, then Find (or Search). Then locate a file named Template Attach Tool.dot.
    2. Replace this with the new version of this file (which may need to be extracted from the file you download, in which case it can be extracted directly into the folder you identified in step 1). The file names should be identical, so if dragging (or extracting) the new file into the Templates folder, you will be asked if you want to replace the existing file. Click OK.
Top of Page

Problem: Installer indicates that Microsoft Word is not installed
even though Microsoft Word 2003 has been installed on the computer. This problem should not occur with Microsoft Word versions 97 to XP.

Cause:
Script Werx installers prior to v10b2 do not know to look for the 2003 version of Word.

Solution:
Obtain a free Script Werx maintenance update.

Note that even though the installer does not work correctly with Word 2003, the Script Werx software being installed does. This means that if Script Werx is installed for an earlier version of Word (97, 2000 or XP), and then Word 2003 is installed on that same computer, Script Werx should continue working fine.

Top of Page

Problem: When pressing some of the keyboard shortcuts indicated in the user guide, nothing happens.

Cause:
Some keyboard shortcuts were lost during an early revision of v10.

Solution:
Obtain a free Script Werx maintenance update.

Top of Page

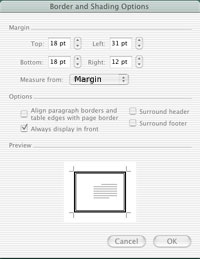
Problem: Borders Outside the Printable Area
When printing a script from a Macintosh, an error message is displayed stating, “The page borders of section 1 are set outside the printable area of the page.”

Cause:
On Macintosh, Microsoft Word's Page Border feature does not work correctly with many printers when the option is chosen to measure the border from the edge of the page.


Solution:
Either obtain a free Script Werx maintenance update or use the following, fairly easy, work-around to remove or modify the page border:

  1. Place your cursor on the cover sheet
  2. From the Format menu, select Borders and Shading
  3. Click the Page Border tab
  4. Either remove the border by clicking None (in the upper left corner under Setting ), or to move the border within the printable area, click the Options button.
  5. In the Border and Shading Options box that opens, in the drop-down list next to the field labeled Measure from, select Margin.
  6. Enter the numbers for distance from the different margins. This will take some experimentation. Try starting with 20 pt for all four measurements.
  7. Click OK to close out of all boxes.
Top of Page


Problem: Script Does Not Attach to a Template
After moving a script between platforms (Mac to Windows or Windows to Mac) the script does not attach to a Script Werx template (the Script Werx menu or toolbars do not appear)

Cause:
Script Werx templates have different names for their Macintosh and Windows versions (done to keep the Windows version backwardly compatible with earlier version of Windows which would accept file names with no more than eight characters). So when a script created on one platform is moved to the other, it tries to attach itself to a template name that does not exist, and by default attaches itself to the Normal template.

Solution:
Attach the script to the appropriate Script Werx template:

  1. On the Tools menu (File menu for versions of Word older than Word 97 or 98) select Templates and Add-Ins. A dialog box will open.
  2. Click the Attach button. A browse dialog box will open.
  3. Use the browse dialog box to select the appropriate Script Werx template.
  4. Click Open to close the browse dialog box.
  5. Click OK to close the Templates and Add-Ins dialog box
Top of Page


Issue: Using Script Werx with MS Word 2001 on Macintosh
Script Werx has been updated to work with Microsoft Word 2001 for Macintosh. Anyone updating to Word 2001 from earlier versions should be aware of two primary issues:
  • Installation Option : Word 2001 now provides a My Templates folder within its Templates folder as a place to store templates you create or purchase (such as Script Werx ). We recommend that you do not use it for Script Werx templates. Although there is no technical reason not to store Script Werx templates in this new folder, doing so creates an extra step when starting a new script and our Script Werx documentation assumes that our templates are kept loose in the Templates folder rather than stored in a folder within this folder.
  • File Menu Change : On the File menu for 2001, a Project Gallery menu item has replaced the New menu item. This means that when starting a new script, you need to choose Project Gallery in order to get access to Script Werx templates.

The current maintenance update of Script Werx for Macintosh includes all revisions needed to work correctly with Word 2001. It is available for download by any registered owner of Script Werx.
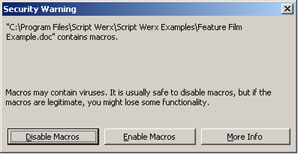
Top of Page


Problem: A Virus is Indicated
A virus detection program indicates that a Script Werx template is suspected of containing a virus

Cause:
On occasion, some virus protection programs, especially from lesser-known companies, mistake some of the more complex macros within Script Werx for a virus. A reason behind this is that Microsoft Word macros are a common means of spreading viruses. In an effort to err on the side of caution, false positives are fairly common.

In three instances, Script Werx has triggered false positives. At no time has any Script Werx template actually carried a virus. Before release, Script Werx software is checked using the most current virus detection software from Virex or McAfee and at no time has a virus been detected.

Solution:
Reinstall Script Werx from your original master disk or installer. Then see if the presence of a virus is still indicated. If so, contact the maker of the virus detection program (or check their web site) to see if they are aware of false positives being triggered by Microsoft Word macros. If not, contact technical support here at Parnassus Software (818) 952-8102. We will follow up with the maker of the virus detection software to determine why it is indicating the presence of a virus.

Top of Page


Problem: Features Don't Work
When clicking on Script Werx toolbar buttons or selecting items on the Script Werx menu, nothing happens, not even an error message.

Cause:
Two typical causes: Multiple scripts open; Disabled macros

Multiple scripts open --If scripts in more than one format are open at the same time (example: a two-column script and a four-column script) features common to both may not work. This means that it is good practice to have only one script open at a time.

Disabled macros --Macros have been disabled during installation of Word. In the interest of preventing the spread of viruses carried by macros, Microsoft now makes it possible to render Word 98 and above incapable of running any Macro; furthermore, the language that presents this option during the installation makes this sound like a pretty good idea.

On Macintosh, this problem can also be caused by corrupted preference files ( see below ).

Solution:

Multiple scripts open --Make sure that all scripts that are open are attached to the same template (example: all open scripts use the feature film format). The use of features is lost only when scripts attached to different templates are open at the same time. Although this can be frustrating enough, no other problems are caused by having different-format scripts open and in no case is there any damage to the files themselves.

Disabled macros --Test to be sure that the macro functionality has been disabled; and if so, reinstall Microsoft Word, being sure to enable macros:
Steps   Details
• Create a new blank document • From the File menu, Select New and then click OK.

By default, this new document will be based on the Normal template, meaning that Script Werx is now in no way affecting the behavior of Word.

To be sure, on the Tools menu, select Templates and Add-Ins. In the dialog box that opens, in the field for Document Template, the word Normal should appear.


• Try to create a new macro.

Within MS Word:
  • From the Tools menu, select Macro, then Macros from the popup menu.
  • Type in a name for the macro (such as "test").
  • Click the Create button.

If this does not allow you to create this test macro, the macro functionality for Word has been disabled.

Top of Page


If the above test shows that the macro functionality has been disabled, reinstall Microsoft Word, being sure to allow the use of macros.

Macintosh Only:
Problems running macros may also be caused by a corruption in any of several preference files. To test for and rectify this situation:

  • Quit out of Microsoft Word
  • From the Preferences folder (within the System folder), drag onto the desktop the following files (they will be recreated when MS Word is launched again; all files may not be present). Note that with Office 2001, there is a Microsoft folder within your Preferences folder, within which some of these files reside (although not all, The Holy Redmond Empire makes its own standards):
    1. Embedding Preferences
    2. Microsoft Office
    3. PPC Registration Database
    4. VBA Preferences
    5. Word Settings (8) [or the version number of the copy of Word being used]
  • From the Extensions folder (within the System folder), drag onto the desktop the following files (they will be recreated when MS Word is launched again; all files may not be present):
    1. Microsoft Component Library
    2. Microsoft OLE Automation
    3. Microsoft OLE Library
    4. Microsoft Structured Storage
  • From the Microsoft Office Templates folder delete Normal

If this fixes the problem, delete the above files that have been left on the desk top. Restore them to their initial locations if the problems worsen.

If you have not done so within the past three months, you should also rebuild the desktop:

  • Restart your Macintosh while holding down the two modifier keys option + command (the apple key).

If you are still having problems of a general nature, such as your Macintosh not starting up properly, "zap" the p-ram:

  • Restart your Macintosh while holding down the four keys: option + command (the apple key) + r + p. You may need help, or hold down one of the keys by holding a pencil in your mouth. Continue holding down all four keys until your Macintosh restarts (you hear the startup sound) at least twice.
Top of Page


Problem: Invalid Path Error
When trying to create a storyboard or a report such as a prompter list or scene list, an Invalid Path error occurs, typically followed by the message that the Storyboard or zBgTmplt template may not be installed.

Cause:
Problems associated with earlier versions of Script Werx.

Solution:
obtain a free maintenance update .

Top of Page


Problem: A capital P cannot be typed
A capital p cannot be printed when using the Feature Film template on a Windows computer.

Cause:
The installer for the Windows version (Mac version was not affected) posted on our Update Download page from 7/10/01 through the morning of 7/24/01 included a Feature Film Template (-FetrFlm.dot) that would not allow the typing of a capital P. The problem has been fixed. If you are using this template, please download the currently posted update to avoid this problem. Downloads from our online order page were not affected.

Solution:
obtain a free maintenance update .

Top of Page


Problem: Two-Column Version Cannot Be Created
when working in a four-column script. Instead, a "...name or path not valid..." (Err = 1055) error occurs.

Cause:
The upgrade to version ten of Script Werx for Windows included changing the names of the templates from eight-character names to more meaningful names (example: -2Column.dot to -Two-Column Template.dot). The code in some of the first version ten installers was not appropriately updated to the new file name.


Solution:
Either obtain a free Script Werx maintenance update or use the following, fairly easy, work-around:

  1. Find the Script Werx templates on your hard drive: Click Start, then use find (or search) to locate a file named -Two-Column Template.dot.
  2. Copy this file (right click and from the pop-up menu, select Copy ).
  3. Paste the copy into the same folder (with the same folder still open and no file selected, right click, then from the pop-up menu, select Paste) .
  4. Rename the file -2Column.dot (right click the new file [copy of -Two-Column Template.dot] and from the pop-up menu, select Rename. Then type in -2Column.dot). Do not forget the hyphen in front, this is critical.

Close the folder and all should now work fine when creating a two-column version of a four-column script.

Top of Page


Problem: Four-Column Version Cannot Be Created
When working in a two-column script, the tool for creating a four-column copy of the script does not work.

Cause:
Problem associated with version 9.0 of Script Werx when running on the Windows NT operating system.


Solution:
Obtain a free Script Werx maintenance update to version 9.0a or above.

Top of Page


Problem: Run-time error 438:
When attempting to import an existing screenplay format script into a Script Werx feature film, corporate screenplay, 3-camera or live-tape format.

Cause:
Problem associated with version 9.0a of Script Werx for Windows.

Solution:
Obtain a free Script Werx maintenance update to version 9.0b or above.

Top of Page


Problem: Compile Error When Applying Line Numbers
When attempting to apply line numbers to a two-column script, a compile error occurs.

Cause:
Problem associated with version 9.0 of Script Werx when running on a Windows operating system.

Solution:
Obtain a free Script Werx maintenance update to version 9.0a or above.

Top of Page


Problem: Part of Script Does Not Print Out
When using the two-column or four-column format, some part of the script that appears on the screen is missing from the printed script.

Cause:
A single row is longer than a page in length and Cell Breaking is turned off; so the computer is being told to print more than a page of material on a single page. This may be a function of the writer pressing the Return key rather than the Tab key to create new visuals.

Solution:
Always press the Tab key to create a new visual.

Also, as a general rule, shorter rows are better. They certainly should be shorter than a page in length.

You can also set Script Werx to allow page breaks within a row, but be aware that this will place some audio on the page following the accompanying visual (rather than keeping all audio on the same page with its visual). You can do this by turning Cell Breaking on: From the Shortcuts toolbar or Script Werx menu, choose Cell breaking and then click on.

Top of Page


Problem: Dialogue appears without a character name
when creating storyboards from screenplay format scripts (feature film, corporate screenplay, 3-camera or live-tape).

Cause:
The Storyboard template includes a font style named Character, which conflicts with the paragraph style used by screenplay formats called Character.

Solution:
Download and install the current maintenance update or delete the existing Character style from the Storyboard template:

Steps   Details
• Open the Storyboard template.
  1. From the File menu, Select Open.
  2. In the browse box that opens, locate the Templates folder within the folder for Microsoft Office and double click on the Storyboard template: -Strybrd.dot (-Storyboard Template in Macintosh)

The Script Werx Storyboard Template should open.


Delete the style named Character.

  1. On the Format menu, select Style....
  2. On the scrolling list of styles, click once to select the style named Character.
  3. Click the Delete button to delete the style.
  4. Click Close to close the dialog box.
  5. Close the template file, saving changes.

After completing this work around, when creating a storyboard from a screenplay format script that includes dialogue, the name of the character speaking should appear in front of, and set off by a colon from, every block of dialogue.

To create a storyboard from a script, on the Script Werx menu, select Storyboard.


Home Top
Comments about this site
Copyright © 2007 Parnassus Software
All rights reserved.